Using Kamal with Ubicloud

Kamal is an open source tool to deploy web apps anywhere. It simplifies the process of deploying and managing your web app in production with Docker.

Even with Kamal, you still need certain infrastructure primitives, including DNS management, load balancers, and managed databases. Ubicloud offers these primitives on the cloud. We believe the combination of Kamal and Ubicloud provide a compelling open source web app deployment platform.

In this guide, we'll show steps to deploy an example web app through Kamal using Ubicloud services.

Example Kamal App

We will demonstrate how to deploy an HTTPS-enabled Rails app using Kamal and Ubicloud from scratch.

Note:
This content is heavily inspired by DHH’s demo at kamal-deploy.org. We will use similar steps when deploying to Ubicloud.

Step 1: Install Kamal

First things first, we need to install Rails and Kamal. Assuming you have Ruby installation in your local, run;

gem install rails
gem install kamal

Step 2: Create a Simple Rails App

First, create a basic Rails app using PostgreSQL as the database and Tailwind CSS for the frontend:

rails new blog -d postgresql -c tailwind
cd blog
rails generate scaffold post title:string content:text

kamal init

After generating the app, open the project in your favourite text editor.

Now, copy the master key from ./config/master.key and paste it into the .env file:

RAILS_MASTER_KEY=YOUR_MASTER_KEY

Step 3: Configure Routes

Set the root route to serve the /posts endpoint by updating ./config/routes.rb:

root "posts#index"

Step 4: Set Up Docker Registry

Now, we need to set up a dockerhub repository to store and fetch our images. For that, you need to create an account at https://hub.docker.com.
Once you have the account, please create a new repository named “blog” in the docker hub page and generate a new key at https://app.docker.com/settings/personal-access-tokens and paste it to the .env file as shown below.

KAMAL_REGISTRY_PASSWORD=DOCKER_REGISTRY_KEY

Configure the deploy.yml file to put your docker registry and the service names in place;

service: blog

image: YOUR_DOCKER_REGISTRY_NAME/blog

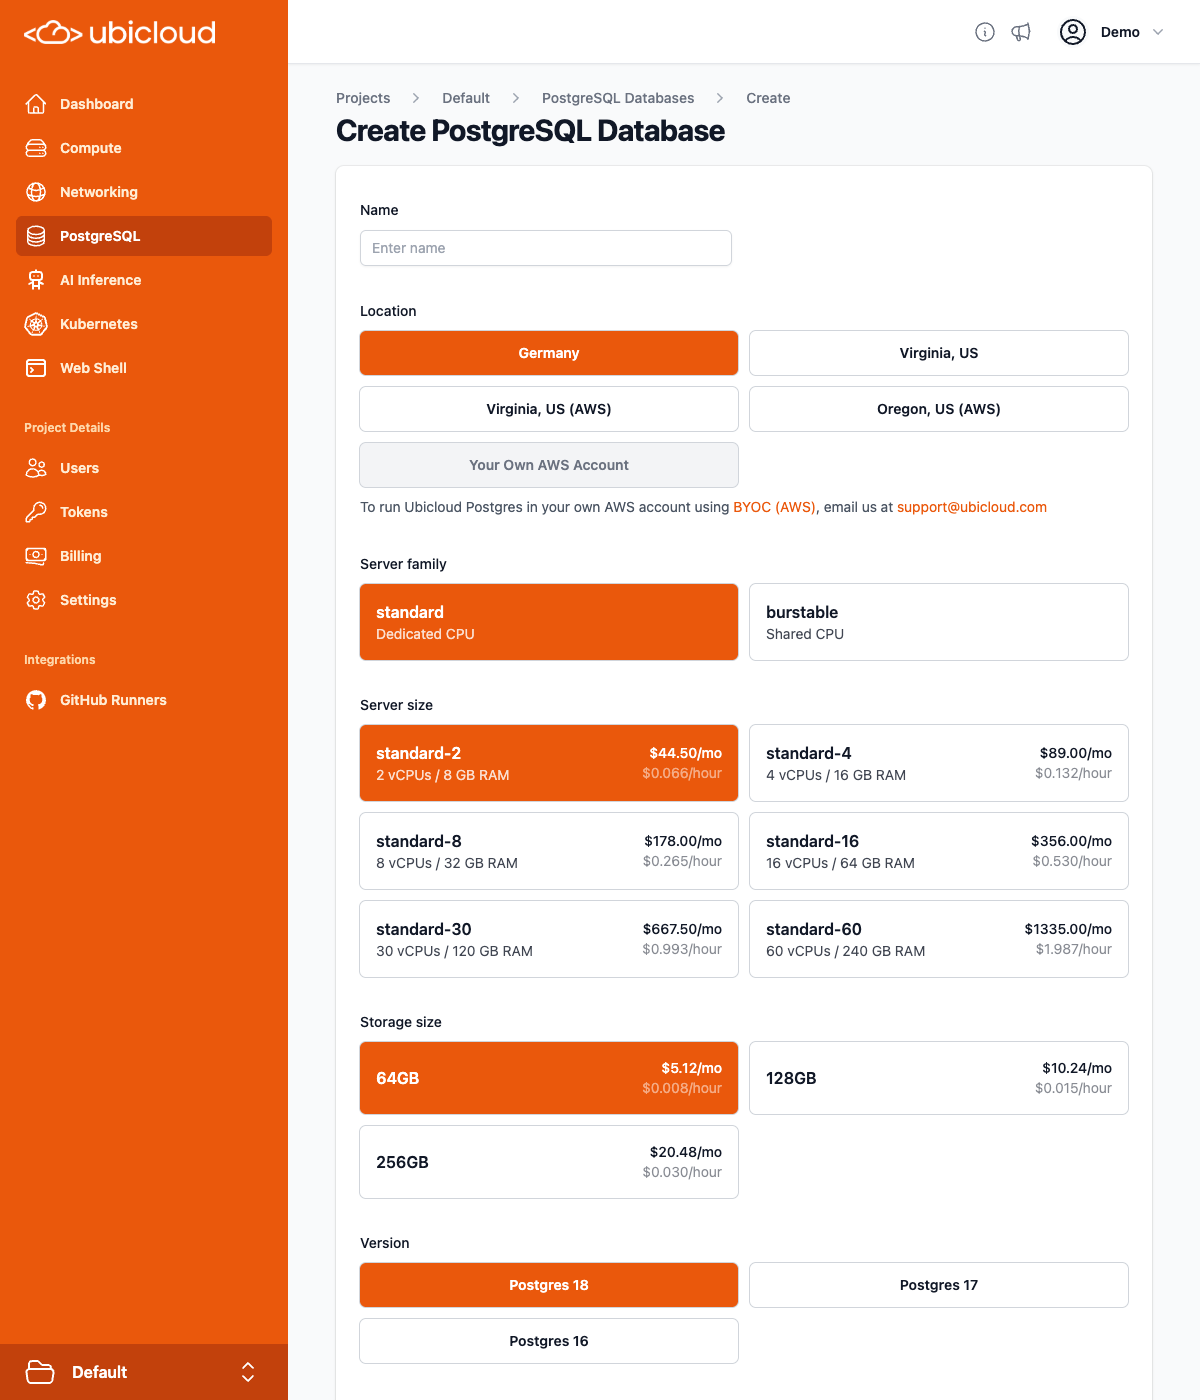
Step 5: Set Up Ubicloud Resources

Create the following resources:

  • Virtual Machines (VMs): Create two VMs from console.ubicloud.com. When creating the VM, you need to pay attention to three things.

    • For the location, pick Germany. Later, we’re going to provision a managed Postgres in the same region.

    • Use the same private subnet for VMs, load balancer, and managed Postgres. If you don’t already have a private subnet, create a new one the very first time.

    • Change the user from “ubi” to “root”. We use “root” because Kamal installs Docker and connects to it on the VMs. Using “root” avoids the need to manage users and groups.

  • Load Balancer: Create a load balancer to distribute traffic and utilize SSL certificates. Pick the private subnet you chose for your VMs, use /up endpoint, ports 443 and HTTPS as the health check protocol. If you need more info, you can also visit our Load Balancer Guide.

  • Add VMs to the Load Balancer: We need to attach our VMs to the load balancer as shown below.
  • Managed PostgreSQL Database: Set up a managed PostgreSQL database.

Step 6: Gather Resource Information

After setting up the resources, collect the following information from the Ubicloud Console:

  • Public IPs of the VMs: IP1, IP2
  • Load Balancer DNS name: myblog.xxx.lb.ubicloud.com
  • PostgreSQL Connection String: postgres://postgres:password@hostname?channel_binding=require

Step 7: Configure Kamal and Environment Variables

Configure servers and the load balancer in deploy.yml:

servers:
 web:
   hosts:
     - IP1
     - IP2
   labels:
     traefik.http.routers.blog.rule: Host(`myblog.xxx.lb.ubicloud.com`)
     traefik.http.routers.blog.tls: true
     traefik.http.routers.blog.entrypoints: websecure

Add the PostgreSQL connection string to the .env file:

DATABASE_URL="postgres://postgres:password@hostname/?channel_binding=require"

Update deploy.yml to pass the environment variables:

env:  
 secret:
   - RAILS_MASTER_KEY
   - DATABASE_URL

Modify database.yml to use the environment variable. The DATABASE_URL environment variable will already contain the user, password and the database name:

production:
 <<: *default
 url: <%= ENV["DATABASE_URL"] %>

Step 8: Configure Traefik for SSL Certificates

Configure Traefik to use the SSL certificates provided by Ubicloud. Update deploy.yml:

traefik:
 options:
   publish:
     - "443:443"
   volume:
     - "/etc/ssl/certs/ubi_cert.pem:/etc/ssl/certs/ubi.cert"
     - "/etc/ssl/private/ubi_key.pem:/etc/ssl/private/ubi.key"
     - "/root/providers.yml:/providers.yml"
 args:
   entryPoints.websecure.address: ":443"
   entryPoints.web.http.redirections.entryPoint.to: websecure
   entryPoints.web.http.redirections.entryPoint.scheme: https
   entryPoints.web.http.redirections.entryPoint.permanent: true
   providers.file.filename: "/providers.yml"

Step 9: Pre-Traefik Reboot Hook

Use Kamal hooks to pull SSL certificates into the VM. Rename the pre-traefik-reboot.sample file at .kamal/hooks/ directory to pre-traefik-reboot and insert the following script:

#!/bin/sh
for ip in ${KAMAL_HOSTS//,/ }
do
 ssh -o StrictHostKeyChecking=no -o UserKnownHostsFile=/dev/null -o LogLevel=ERROR -o User=root $ip "rm -rf /etc/ssl/certs/ubi_cert.pem"
 ssh -o StrictHostKeyChecking=no -o UserKnownHostsFile=/dev/null -o LogLevel=ERROR -o User=root $ip "rm -rf /etc/ssl/private/ubi_key.pem"
 ssh -o StrictHostKeyChecking=no -o UserKnownHostsFile=/dev/null -o LogLevel=ERROR -o User=root $ip "rm -rf /root/providers.yml"
 ssh -o StrictHostKeyChecking=no -o UserKnownHostsFile=/dev/null -o LogLevel=ERROR -o User=root $ip "curl [FD00:0B1C:100D:5afe:CE::]:8080/load-balancer/cert.pem > /etc/ssl/certs/ubi_cert.pem"
 ssh -o StrictHostKeyChecking=no -o UserKnownHostsFile=/dev/null -o LogLevel=ERROR -o User=root $ip "curl [FD00:0B1C:100D:5afe:CE::]:8080/load-balancer/key.pem > /etc/ssl/private/ubi_key.pem"
 ssh -o StrictHostKeyChecking=no -o UserKnownHostsFile=/dev/null -o LogLevel=ERROR -o User=root $ip "touch /root/providers.yml"
 ssh -o StrictHostKeyChecking=no -o UserKnownHostsFile=/dev/null -o LogLevel=ERROR -o User=root $ip "echo 'tls:
 certificates:
   - certFile: /etc/ssl/certs/ubi.cert
     keyFile: /etc/ssl/private/ubi.key
     stores:
       - default' > /root/providers.yml"
done

Step 10: Deploy the Application

Commit your changes:

git add .
git commit -m "First Ubicloud and Kamal App"

Run Kamal setup:

sudo kamal setup

Reboot Traefik to execute the pre-traefik-reboot hook:

kamal traefik reboot

Step 11: Enjoy Your HTTPS-Enabled Rails App

Visit the load balancer DNS name and enjoy your newly deployed, secure Rails app!

By following these steps, you can seamlessly integrate Kamal with Ubicloud services to deploy your web applications efficiently and securely. If you have any questions or need further assistance, feel free to reach out to our support team.